Defining Credits, Certificates and Previewing Certificates
How do I Define my Credits and Certificate?
- Click Dashboard
- Click Credits Management in left side menu
- In Select Conference, pick the appropriate Conference from the dropdown list
- Click Certificates button
- Click New Type button
- Enter the Credit Name e.g. Attendance
- Enter a Certificate Name e.g. Certificate of Attendance
- Enter Certificate Max value - the total number of claimable credits
- For Certificate Sessions - if only specific session are creditable, then select from within the list that appear here.
- Enter Certificate Width = 11 (in inches the dimensions of the certificate width size)
- Enter Certificate Height = 8.5 (in inches the dimensions of the certificate height size)
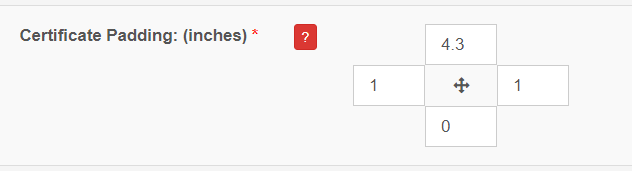
- Enter Certificate Padding - in inches the distance of whitespace between the text and background image of the certificate. If you want the text to be in the middle of the certificate we recommend entering the following values:
- Enter Certificate Background Image - upload a template of the background containing any images and signatures to be used for the certificate
- Enter Certificate Content - Customize the certificate text using the [Hot Keys] and include any required accreditation statements mandated by your credit provider.
- Enter Email From Name
- Enter Email Subject e.g. Certificate of Attendance
- Enter your Email Content
- Click Update Credit Type button


How do I preview a Certificate?
- Click Dashboard
- Click Credits Management in left side menu
- In Select Conference, pick the appropriate Conference from the dropdown list
- Click Certificates button
- Click Update button beside the Certificate you wish to view
- Scroll down to the Certificate Content field, click Preview button to the left of the field under HOT KEYS
- NOTE: this should open a window with a PDF sample of the certificate; if this is not working in the current browser you are in, try in a different browser such as Google Chrome or Safari
Related Articles
Credits Module Settings
What are the different settings for the Education Credits Screen? Click Dashboard Click Credits Management in left side menu If you have more than one conference, select Conference from the dropdown list Click Settings button You may Set or Update ...
Editing Your Certificate
How to upload my certificate background image? Note: You will need to have a PNG image created that is approximately 1000 pixels by 700 pixels (or 700 pixels by 1000 pixels, depending if your certificate is landscape or portrait) The image should ...
Managing Credits - adding, removing, edit, assigning
How to manually add a participant? Click Dashboard Click Credit Management in left side menu If there is more than one conference, select the applicable Conference from the dropdown list Under the Menu section, select + Add Single Participant If the ...
CME Certificates
CME Certificates and Accreditation can be added into the mobile app so attendees can have access to their certificate straight through their phones. Access the Certificate from your Phone The Certificate can be accessed by going to your attendee ...
How do attendees access the Certificate(s) / Credit(s)?
If you are using the Online Program module or the Mobile app, the Certificate would be accessible from within the online program and/or mobile app directly. Click Dashboard Click Credits Management in the left side menu In Select Conference, pick the ...